Implant position, especially for edentulous cases, isn’t the easiest thing to capture.
Even with an intraoral scanner, the captured 3D image of the implants’ positioning could be more accurate. That’s because a lot of intraoral scanners rely on teeth for reference.
The slightest inaccuracy in a denture can cause fractures and complications. Even if it’s made of zirconia, patients will be back in a year or two due to a fractured denture.
So, the only way to achieve long-lasting implant-based restorations is through a passive fit.
A passive fit can be done through 100% scan accuracy. Not 99%, but exactly 100%.

We conducted a discussion with Dr. Horst Beyer, founder and CEO of Swiss dental tech company, Imetric4D. He discussed how dentists can take precise and accurate scans of implant positions — even more accurate than with an intraoral scanner.
At the end of this guide, dentists will learn about the necessary tools and practices required to perfectly capture implant positioning.
Photogrammetry
Photogrammetry differs from IOS scans when it comes to capturing three-dimensional image data.
It involves capturing multiple 2D images of the oral cavity with cameras from different angles. Specialized software then processes the images to create a 3D model.
Photogrammetry can be used to assess implant positioning in the patient’s mouth. Due to the technology’s accuracy, photogrammetry eliminates, if not reduces, the need to use analog verification jigs.
This hastens the full-mouth procedure, giving a patient new teeth much faster than if no photogrammetry was used.
In addition, photogrammetry ensures a passive fit between the prosthesis and the implants. This reduces errors and complications in the long run, resulting in better longevity for the prosthesis.
And better comfort for the patient, of course.
One notable photogrammetry tool used in permanent full-mouth procedures is the ICam4D.
ICam4D
The ICam4D has four cameras, each viewing the subject from different angles. This allows it to take precise data on the position of the implants.
This camera unit is held like a steering wheel—each hand gripping both ends of the unit.
The unit is used in conjunction with specialized scan bodies. IMetric4D developed these scan bodies specifically to be used with the ICam.
Dr. Beyer applies the Six Sigma approach to improve the efficacy of their products. This was the philosophy for both the hardware and software of the ICam4D.
The dedication to a useful, error-free workflow allows the ICam4D to capture implants more accurately than intraoral scanners.
Dr. Beyer claims that it’s 10 times more accurate than intraoral scanners.
The benefits of the ICam4D include:
Eliminates Remakes
ICam4D reduces the need for retries due to its perfect scans of implant positions.
Labs can create full-mouth restorations that fit on the first try, saving significant money and time for both the dentist and the lab.
This also allows patients to receive a perfect-fitting temporary all-on-x on the same day of surgery.
The result—they can get home with teeth in their mouth.
Easy Operability
The results obtained by the ICam4D are independent of the operator’s skill level.
So, dentists can expect a reliable workflow that gets predictable and consistent outcomes.
The ease of operation also allows dental clinics to much more easily train their staff.
What is Needed for This Photogrammetry Workflow?
There are a few things needed for the ICam 4D workflow. These are:
- The ICam4D camera unit
- The ICam4D scan bodies
- A computer hub.
There are some particular specs to take note of when choosing a computer hub for the ICam4D.
Computing Power
The ICam4D requires less demanding computer specs than what IOS scanners would require.
Dr. Beyer details the following required computer specs:
- Intel i7 11th to 12th Gen CPU
- 16GB RAM
Unlike IOS scanners, the ICam4D doesn’t require a graphics processor (GPU).
The GPU is a powerful computer component that renders images. This is crucial for intraoral scanners’ accompanying software for them to generate the 3D image. But this isn’t required for the ICam4D.
In addition, the ICam4D can make do with 16GB of RAM.
That’s half of what the leading IOS scanners require in their computer hub.
The ICam4D Workflow
Here’s the step-by-step ICam4D workflow after the patient has implants placed in their mouth.
Place the ICam Scan Bodies before Suturing
The ICam scan bodies help the ICam4D take the most accurate positional data on the implants. These are attached to the multi-unit abutments in the patient’s mouth.
They’re made of titanium and are quite small. 12mm high and 4mm wide.
Once they’re properly seated onto the MUAs, the dentist can proceed to use the ICam4D camera unit.
Use the ICam4D to Capture the Scan Bodies
The camera unit is then faced toward the scan bodies in the patient’s mouth.
It analyzes the scan bodies with its four cameras. The software then triangulates the captured images to give the exact coordinates, distance, and angulation of the implants.
The camera unit will beep, indicating to the operator that the implant position was taken properly. This makes the camera unit intuitive and straightforward to use.
This process takes just a few minutes.
Take Out the Scan Bodies
Once the ICam4D camera unit is done capturing implant position, the ICam scan bodies are removed.
But the patient isn’t sutured up just yet.
Place Healing Caps
After removing the ICam scan bodies, any of the two may be placed onto the MUAs:
- Healing Caps
- Intraoral Scanner Scan Bodies.
Once either the healing caps or scan bodies are secured, the patient is then sutured up for the next step.
Scan the Gingiva
Scanning the gingiva will allow labs to create a well-contoured prosthetic that will fit perfectly over the tissue. Labs rely on the gingiva scan, together with the implant position, to create the best fitting all-on-x possible.
There are two ways to get an accurate model of the gingiva.
The first method is with an intraoral scanner. But for edentulous patients, some scanners will struggle to capture a perfect arch model.
An alternative is the good ol’ traditional impression. Simply take a negative impression of the arch with the healing caps/scan bodies on. Then, use an intraoral scanner to scan the impression.
Scan the Opposing and the Bite
After the scan of the gingiva is taken, dentists should then scan the opposing arch and, when applicable, the bite.
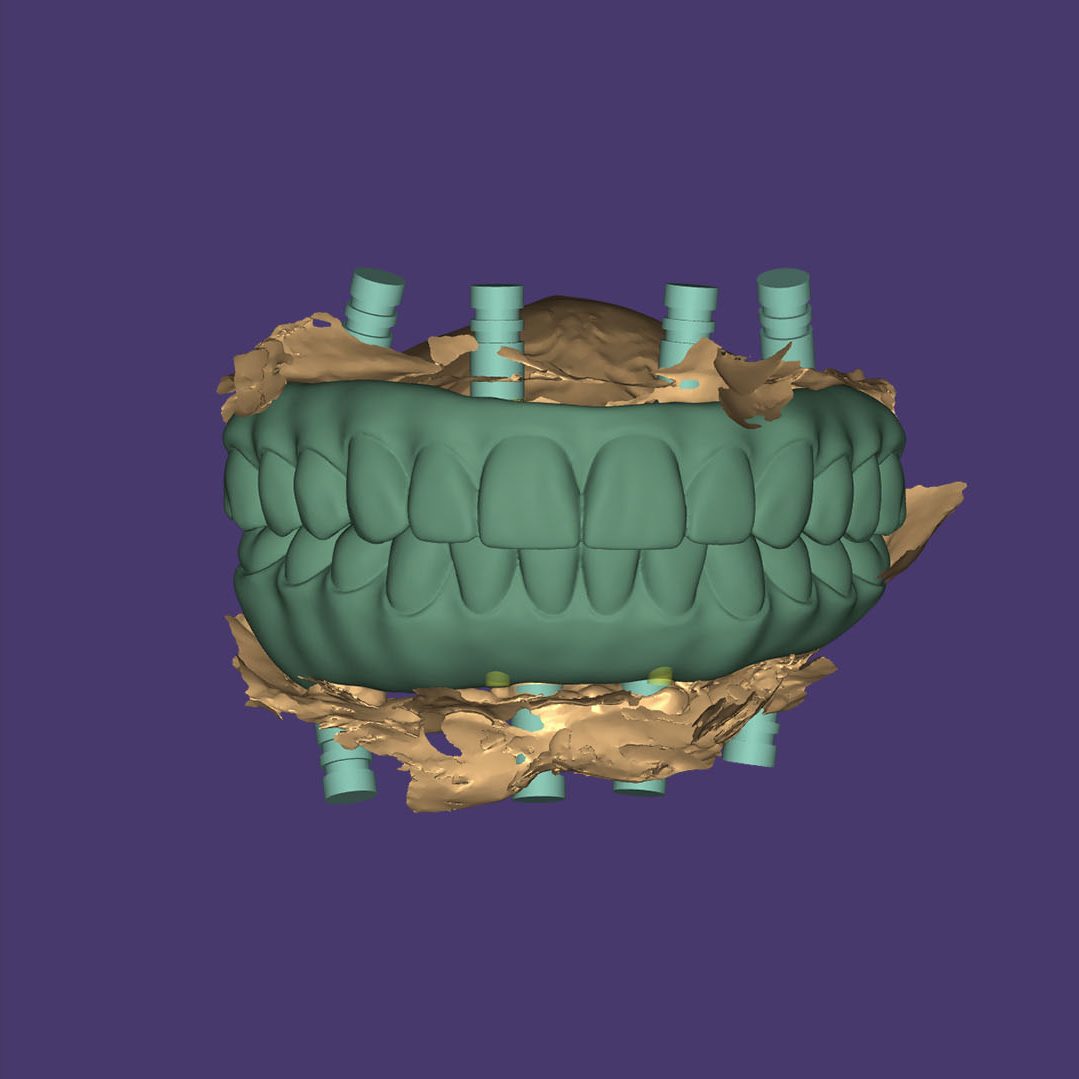
Stack the Photogrammetry Data with the Scan Data
Dentists compile the scans taken by the intraoral scanner and the ICam4D camera.
They are then sent to the lab to be stacked.
The lab would now have complete information on the 1) implant position and orientation, 2) gingiva, 3) opposing, and 4) bite and occlusion of the patient.
With this data, the lab generates a new permanent denture for the patient—one that fits perfectly the first time.
Limitations
Though there are a ton of benefits to the ICam4D workflow, it’s important to note that it’s not for everyone.
For one, dentists need to be doing a lot of implant-based restorations, such as all-on-x, to maximize the ICam4D. However, Dr. Beyer mentions that some of his clients adopted the ICam4D only after working on a few all-on-x cases.
Another thing to consider is that the ICam4D is not an intraoral scanner replacement.
The ICam4D doesn’t have the functionality and capability of an intraoral scanner. Dentists will still need an intraoral scanner to scan the arches—necessary data for implant procedures.
So if dentists haven’t built their digital arsenal, they may need to get an IOS scanner first.
Even after getting an intraoral scanner, the better option for the next investment would be a 3D printer.
Only when they decide to service implant-based restorations will dental photogrammetry be a game-changing investment.
Conclusion
When adopting dental photogrammetry into a workflow, the partnered lab must have the technology and capability to work with the scans.
Evident adapts to any workflow. So, whether you have a TRIOS, Primescan, or iTero Element scanner, we can use your scans.
We’ll design a ready-to-print model file that can be printed on any printer. This includes Formlabs, Ackuretta, Sprintray, and much more.
Send Evident your scans now.
We work quickly too. You can get a digital model of your denture back in as little as 30 minutes.