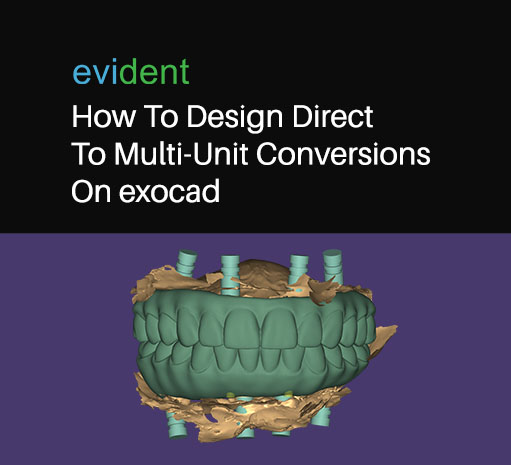

All-On-X dental procedures used to be a complex, time-consuming task, but not anymore. Thanks to a method called direct to multi-unit conversions and a tool called exocad, we can now simplify the process.
This tutorial will guide you through this process step-by-step. Whether you’re a seasoned lab tech or a beginner, you’ll find this guide helpful.
In this Evident Lab-to-Lab Webinar, we learn how to perform this unique workflow that helps labs cut down turnaround time, produce an extremely aesthetic result, and capture a newly modified tissue after surgery all while cutting down costs.
The accurate results produced by the direct to multi-unit conversion process are far superior to those produced with the previous analog workflow. Meaning, this gets you as close to that passive fit that all lab techs aspire to for all-on-X.
What is an All-On-X Case?
The term ‘all-on-X case’ describes a denture recipient or a prospective patient due to receive four or more implants along with a fixed prosthesis. This combination replicates and restores a full dental arch.
In this case, a dental lab tech performs what’s called the conversion process. This requires the creation of a denture and bringing it on the day of surgery and then converting that denture into a fixed prosthetic.
Most lab techs experienced with all-on-X cases can tell you – it’s not the most predictable process. You might face several issues and roadblocks along the way.
For example, cutting holes during surgery is often part of the procedure. Setting up cylinders that may be redirected can also be challenging. Another step involves cutting and polishing the prosthetic. These are just a few of the tasks that can make the process complex.
Moreover, it is also a time-bound process. Dentists, patients, and other clinical staff are waiting on the finished product as each minute passes by. As a lab tech, it can often be one of the most high-pressure situations to be in. This is the issue that direct to multi-unit conversions aims to address.
Exocad Walkthrough of Direct to Multi-Unit Conversions
A direct to multi-unit conversion simplifies the prosthetic design process. It happens at the time of surgery.
The goal is to create a prosthesis that requires little or no modifications. It’s designed to screw down easily. This method replaces the entire conventional conversion process. It makes use of scan bodies to aid the design. This streamlines the entire process.
There are several different ways to achieve this. And there are many different types of all-on-X cases, including ones you can do on the upper, lower, or both at the same time.
In the case for this session, we will be working on a mandibular arch where the patient has an existing restoration on the top arch.
For future applications, it is highly recommended to get crucial scans from the dentist. This includes a scan of the dental arches, tissue scans, and scan body scans to have a solid base to begin with. Do this before proceeding to designing a dental case.
- Aligning the initial scans
When you receive a series of scans, they will typically be jumbled up and misaligned. In this crucial step, you will need to align the upper and lower scans to the working scan. Make sure that each scan corresponds with one another.
The upper arch is usually easier to align as you have a hard palate to align to. For the upper arch, you just need to verify that the teeth and occlusions are in the right place. Because this case is focused on the lower dental arch, the scan needs to be as detailed as possible.
Aligning the tissue scan to the body scan is a critical step in ensuring that the prosthesis aligns with the rest of the mouth once installed. In this step, you will also be creating the space in which you will design the restoration.
- Isolate the ridge
To move forward with designing, clean up unnecessary elements in the design to expose only the ridge. Extract the scan body posts using the “extract tooth” wizard to clean up the base.
Using “free form scan data,” smooth out the ridge and get as close to the tissue as possible. When cleaning out the model, make sure to view it at different angles to remove any floating and unnecessary data from the design.
In doing this step, take care not to eliminate any tissue. If the model winds up having any holes, you can remedy this with the help of exocad’s intuitive software. This layer is the starting point of the rest of the model.
- Align the bite
To ensure that the prosthesis is in accordance with the rest of the mouth, it is highly recommended to align the bite using the articulator tool. Position the design in the right plane of occlusion and correct the orientation. Make sure to get it as close as possible to the articulator jaw.
Show the antagonist arch layer and open the bite accordingly to align it, maneuvering the main arch as you see fit. Once the bite is saved, you now have the right occlusal space to work with. Hide the antagonist and begin designing the teeth.
- Design and align the teeth
Using the “place tooth models” wizard, you can now begin working on the teeth. Align the back teeth on the ridge and lay out an arch model. You can do this using the library housed in the exocad software.
Design the lower arch according to the upper and ensure that both arches correspond to each other. If you’d like to verify and cross check, you can also show the antagonist and adjust accordingly.
Tweak the proportions of the main arch and shift the positioning accordingly. Once initial alignments are in place, use the “chain” mode on the software wizard to fine tune the teeth alignment without taking it too far from the rest of the teeth along the arch.
Finally, make sure the midlines are aligned as a finishing filter to indicate that the teeth are in the right positions.
- Optimizing occlusions
After designing the teeth, the next step would be to optimize the occlusions. This is so that when the patient bites down, the teeth make contact properly along both arches. In this stage, exocad will show “heatmap” forms along the tops of the teeth to indicate where there would be too little or too much pressure between the two arches.
Modify the shape of the tooth surface to remedy this and to ensure that they are level. A good rule of thumb is if the heatmaps show red/pink, you would need to reduce that surface. This streamlines the work that the software has to do and minimizes the need for further revision.
The static occlusion option will then cut the occlusion to match the opposing arch. Set the intaglio surface so that it doesn’t protrude too much. Allow the software to cut out unnecessary protrusions from the intaglio surface. After this, you can begin designing the virtual gingiva.
- Design the Tissue
Exocad’s capability for designing tissue on dental implants is superior to many dental design software options. Meaning this step can be accomplished accurately and quickly. It intuitively fills up the relevant space and brings the tissue up to the cervical margin with minimal need for intervention.
Outline the teeth to let the software calculate the tissue. Once it has rendered in, the only intervention that needs to be done would be to move the tissue up between teeth and adjust accordingly.
Merge the tissue and the teeth, and smooth out any points that need retouching, especially on the outer plane of the dental arch. After cross checking with the antagonist arch, you can now move on to the final step.
- Create the final multi-unit restoration
Align the tissue and scan bodies with the full restoration, ensuring that the angle and positioning of the abutments are perfectly aligned. The screw access holes should also be aligned. This ensures a precise fit on the prosthesis.
Exocad has a “best fit” matching option on the wizard that will greatly simplify the process. After this you would only need to do some final checks and touch-ups before saving your progress. The case will then be ready for production.
Designing Direct to Multi-Unit Conversions
Designing a direct to multi-unit conversion takes just one to two hours. This makes it a timely solution for all-on-X cases. The fit is perfect. There are no caps inside the direct to multi-unit system. This ensures precision.
The process perfectly sets the occlusions thanks to its pre-alignments. It also optimally places abutments and screw access holes, maintaining the integrity of the restoration.
All in all, direct to multi-unit conversions are one of the game-changing innovations from digital dentistry that drastically improve the way dentists can treat complex cases.
Complex dental treatments are only one area where the digital transformation of dentistry has caused immense growth. Evident Digital is committed to empowering clinics of any size to achieve this growth. We cover solutions ranging from lab management to digital dental equipment.
Evident is your one stop shop for everything digital dentistry, allowing you to scale your practice and set your superior services apart from competitors in the area. Secure your place in the future of dentistry and learn more about Evident Digital today.