Trial smiles are the most dynamic and engaging smile mock-ups that dentists can show their patients. Patients wear them in the mouth, making for a better mock-up experience than static photo mock-ups.
Knowing how to create trial smiles will improve the patient experience and make for a much more intuitive case presentation.
This results in heightened case acceptance.
Our guide will detail the steps, equipment, and processes involved in creating trial smiles in-house. After reading, dentists will have an idea of how they can create trial smiles chairside, improving their patient experience and case presentation.
Here’s how to get started:
Step#1 Scan the Patient
Using an Intraoral Scanner, dentists take a digital impression of the patient’s current set of teeth. Dentists should capture the upper arch, lower arch, and bite for comprehensive data on the patient’s teeth relationship.
Any IO Scanner on the market will do. But the more accurate and reliable a scanner is, the better the smile mock-up will be.
It’s also important to note that some IO Scanners will come with additional software, such as smile design software, that can help in later steps. 3Shape and Medit’s scanners have smile design tools that users can adopt into their patients’ dental workflow.
Step#2 Take Photos of the Patient’s Face and Smile
Another set of data dentists will need is the patient’s dentofacial features.
Taking a photo of the patient’s face and smile will give the dentist a solid reference for the patient’s facial anatomy.
This is key to creating a smile that will blend harmoniously with the rest of the patient’s facial features. A smile needs to match the eyes.
There are some rules to follow when taking patients’ photos for optimal dentofacial analysis:
- Make sure that the patient’s background is clean, preferably a solid color. A white wall will work great.
- The patient’s face should be well-lit. Allow natural light to enter the room. Dentists may also use the built-in flash of their chosen camera, as long as the patient’s facial features are clearly seen.
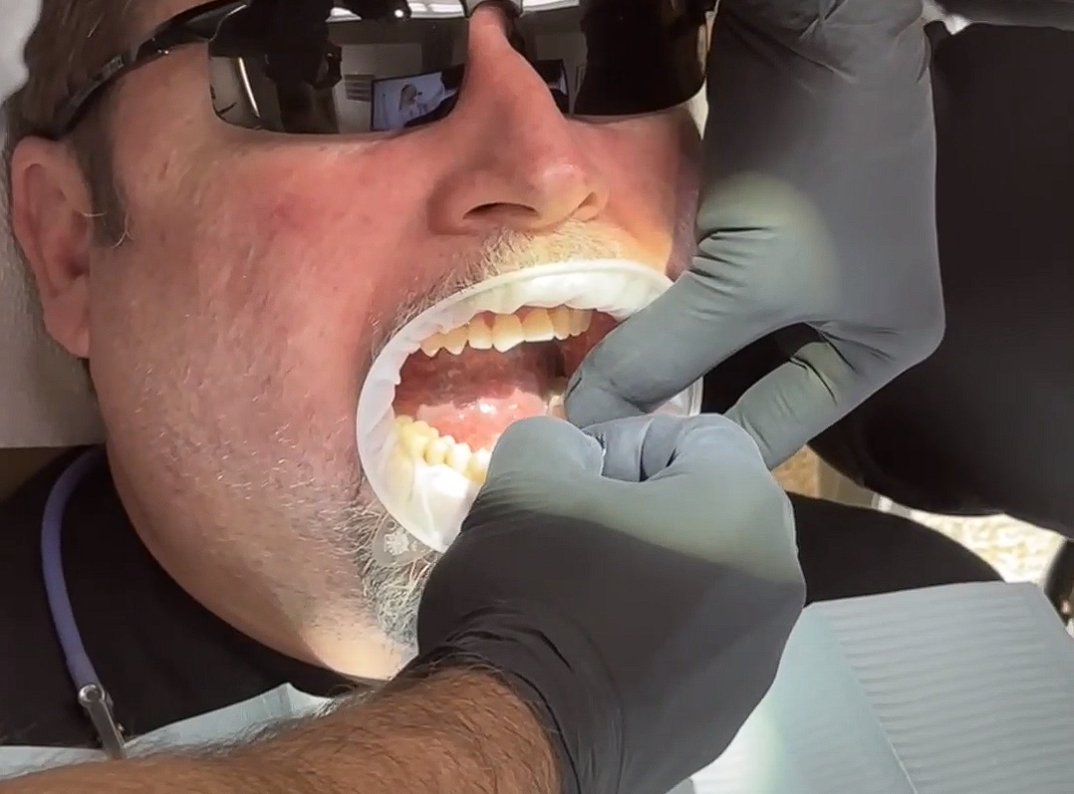
- Have a cotton roll in between the upper and lower molars for them to bite down on. This will allow them to lightly bite down, emulating a natural smile.
- There are three photos needed for a complete dentofacial analysis — 1) retracted, wherein the lips and cheeks are retracted, revealing the patient’s entire set of teeth in their mouth; 2) repose, wherein the dentist gets the patient to say “Emma”, taking the photo at “-ma”; and 3) Duchenne, where the patient smiles exaggeratedly.
Evident suggests taking these three photos for the best facial analysis, but other labs might have different instructions.
Step#3 Design the 2D Smile
The 2D Smile is the initial mock-up that will be created before piecing together the more comprehensive 3D mock-up.
This mock-up can be done in video editing apps like Photoshop, dedicated smile design tools like DSD, and, as mentioned earlier, IOS Scanner system apps like Medit Smile Design that’s available to Medit scanner users.
In the design software, dentists can change the shape and size of individual teeth to create a better-looking new smile.
Alternatively, dentists can offload the 2D smile design process to a design partner.
Here at Evident, we work with hundreds of designers. We can return a 2D smile design in as little as 30 minutes.
Once dentists have the 2D mock-up, they may proceed with the more complex 3D smile design process.
Step#4 Design the 3D Smile
The 3D smile design is based on the 2D smile design and the patient’s current set of teeth.
Designing the 3D smile is crucial since it’s used for treatment planning.
But it’s also used to create trial smiles. You’ll see why later.
Option#1 Closed System
If dentists want to design the smile themselves, they’ll need a complete, in-house CAD system. CEREC and 3Shape offer these systems, providing a complete ecosystem of chairside CAD for their users.
Option#2 Open System
Alternatively, dentists may opt for an open system. They can work with an open system software like exocad — a CAD software that works with any IOS scanner and printer.
In addition to these equipment costs, dentists will need to dedicate time to learning 3D design. This is a crucial skill needed to 3D design smiles.
Option#3 Outsource the smile design
If the necessary equipment and knowledge seem hefty, dentists have the option to outsource smile design. Dentists can still create trial smiles in-house, even if they outsource their 3D smile design.
Evident can create a 3D smile design for dentists. Just like the 2D smile design, we make quick, quality work with the 3D model.
All dentists have to do is 3D print the created design in-house. Fortunately, 3D printers don’t cost a tenth of the cost of complete chairside systems.
Step#5 3D Print the Smile
After dentists receive the 3D smile design, they can turn it into a real-life physical object by 3D printing it.
Step#6 Create a Mold From the Printed Smile
Once the ideal 3D smile has been printed, dentists then create a mold out of it.
The dentist creates a negative impression mold for each arch that will be treated or restored.
If only the upper arch needs treatment or restoration, then the dentist only needs to create an upper arch negative impression mold. But if both arches need to be treated or restored, then the dentist will create an upper and a lower negative impression mold.
The negative impression molds’’ purpose are:
- to take a negative impression of the printed smile and
- function as a tray to place the mock-up smile on the patient’s actual teeth.
Dentists will then cut out pieces of the negative impression mold, shaping it like a tray to go over the patient’s arches.
Step#7 Place Mock-Up Material Into the Mold
Composite or acrylic material is poured into each tray. This will allow the material to take the shape of the desired, 3D-designed teeth.
Step#8 Press the Mold Against the Patient’s Current Teeth
The tray containing the composite is then pressed against the patient’s respective arches.
This will attach a temporary smile to the patient’s mouth, allowing them to see how they will look post-treatment.
Some composites and acrylics may be cured with UV light, hardening the temporary smile if needed.
Dentists may also choose to stain and glaze the temporary smile for a more true-to-life mockup.
Step#9 Show the Patient their To-Be Smile
Once the trial smile is in the patient’s mouth, it’s time to show it to the patient.
This is the big “ta-da!” of the procedure.
The dentist can simply give the patient a mirror. But for that extra flair and presentation, it’s better to have an in-office studio where patients can pose and flaunt their new smile.
After all, there’s a different level of appreciation for a smile when it’s shown through stunning photos compared to looking in a mirror.
Conclusion
Trial smiles are a stellar way of improving patient experience and increasing case acceptance. However, some stages, such as the 2D design and CAD process, can be difficult to provide in-house.
That doesn’t mean dentists can’t provide trial smiles during the first appointment. Outsourcing to reliable partners—ones that make quick work—will allow dentists to provide trial smiles within the same appointment.
Give Evident a call now. We can design 2D smiles, 3D smiles, and even the necessary components and restorations (e.g., Kois deprogrammer, all-on-x, etc.) needed to give the patient their ideal smile.