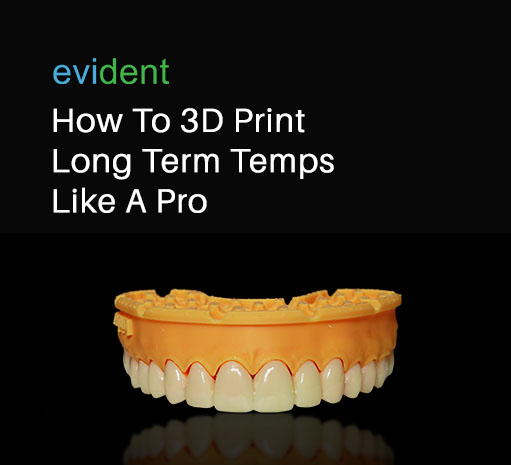
When it comes to temporary crowns and bridges, their primary objective is to offer patients a temporary chewing solution while a more permanent restoration is in progress. These long-term temps are efficiently designed, often requiring just a single visit.
As a result, patients can leave their appointment with a newly-fitted temporary restoration, ensuring their comfort and functionality during the transition period.
Ideally, this temp should last long enough until the permanent restoration, usually made of harder, more lasting material, is available. But due to recent advancements in 3D printing technology and resins, dentists can create temps that have better rigidity and flexural strength than PMMA.
Why Should Dentists Print Long-Term Temps?
Dentists would rarely have to grind or burr out pieces of a printed temp. A temp comes out of the printer nozzle exactly as the patient needs it.
Furthermore, the technology to quickly create crowns already exists. There’s no question with regard to the speed and efficiency of creating the temps. Using the digital method, a patient can be fitted with a printed temp — one that’s stronger than PMMA — in just a few hours.
The only limitation now is the strength of dental resins which, at the moment, can already be three times stronger than PMMA. But resins are already rapidly evolving. So, the best time to get into dental printing is now.
Here’s how to print long-term temps:
Step#1 Scan
A digital scan of the patient’s teeth and jaw will serve as a virtual reference for designing the temp. To do that, dentists will need an intraoral (IOS) scanner.
The benefit of the scanning process is that a physical reference, such as a wax-up or negative impression, is not needed to create the temp. The scanning process eliminates the need for physical references, saving the dentist on material costs.
The dentist will need a set of the following scans:
- Upper arch
- Lower arch
- Bite
Each set of scans must be done before the prep and post-prep. Having this data will allow dentists to create crowns and bridges that are exactly like the patient’s non-prepped teeth.
Having the upper arch, lower arch, and bite reference will allow 3D designers to create a temporary tooth (or teeth) that creates an adequate occlusion. That way, temp chipping and grinding are minimized.
Once dentists have the necessary digital scans of the non-prepped and prepped patient, dentists can move on to the design process.
Step#2 Design
In this phase, a temp is 3D designed, allowing the designer to edit and see how the object would look in real life. Unlike the traditional method of creating temps, designers can immediately see the occlusion and fit of a temp without using up any material.
This also means that little to no burring is needed since all edits are done directly in the CAD/CAM software — before the crown even “exists.”
In order to design, dentists will need to learn how to use dental design software, such as 3Shape and exocad. Mastering the software will create a much faster workflow. It’s a more cost-efficient workflow too, since less material will be used up.
However, 3D design is the most difficult skill to pick up in this entire workflow. It may take dentists time before they can consistently create quality temps with CAD/CAM software.
Outsourcing the Digital Design
Alternatively, dentists may partner with a digital design provider that has mastered their craft.
Here at Evident, our designers integrate seamlessly into your workflow. We have over a hundred expert staff that are proficient with exocad, allowing us a quick but quality turnaround on digital designs. Dentists will get ready-to-print STL files within 24 hours or less.
Simply send us the necessary scans, the Rx, and some other crucial details. What are your ideal central lengths? How tight do you want your occlusal contacts? Do you want us to nest the design for you? You can personalize your design with us to fit your patient’s needs and accommodate your current dental workflow. Just let us know, and we’ll do the rest.
Step#3 Print
After the STL file has been returned, dentists may begin printing.
The following items are needed to turn an STL file into a real-life object:
- A 3D printer
- Dental resin
- Nesting software
Popular 3D printers used in dental applications include Formlabs Form printers, the Ackuretta Sol, and Shining3D’s AccuFab Printers. Whichever printer you choose, get the compatible dental resin and nesting software that work with the printer.
The resin is the material needed to print out the temporary crown. This is basically the 3D printer’s ink.
Whereas the nesting or slicing software tells the printer what to do based on the STL file model. It processes the 3D model and generates a series of 2D slices (hence the term, “slicing”) that represent each layer of the object. Then, the software determines the exact movements and instructions that the printer’s extruder (or laser) needs to follow to create each layer.
Evident has found that the Saremco Crowntec resin works with Ackuretta’s printer and slicing software — the Ackuretta Sol and the Alpha AI. Saremco Crowntec is stronger than PMMA, making it ideal for permanent crowns and bridges. It’s also excellent for sturdy, long-lasting temps with high flexural strength.
After the temp has been printed, it’s not yet safe to be placed in the patient’s mouth. It has to be cleaned and cured first.
Cleaning
The cleaning process removes any unwanted materials from the printed temp, such as dirt or excess resin.
Cleaning is typically done with a cleaning solution and a brush. But some more advanced methods include an IPA bath or using a dental washer. Dentists can rarely go wrong with cleaning the printed part.
However, printers or resins may sometimes have specific cleaning instructions for dentists. In the case of the Saremco Crowntec resin, the resin manufacturer advises users to wipe away excess resin and dirt using a brush and alcohol.
Once it’s cleaned and wiped down, it’s ready for curing.
Curing
The curing process tightens the bond between the particles of a printed part. This solidifies the part, making it stronger and more compact. This is especially important for temporary crowns and bridges as they’ll need to function like regular teeth.
The curing process will be different depending on the 3D printing method used. The commonly used DLP printers typically utilize a curing oven for curing, wherein the printed part is cured with UV light.
When using Saremco Crowntec resin, Saremco recommends soaking the post-cured temp in boiling water for two minutes to achieve its optimal flexural strength. Take note of any special curing instructions your resin provider may have.
As for selecting a curing unit, it may not yield the ideal results when paired with printers and resins it isn’t compatible with. So, it’s best to consult with the printer manufacturer before getting a curing unit.
3D Printing Long-Term Temps
Some dental suppliers sell the printer, curing unit, and resin — all compatible with each other — as a package. Dentists and labs can’t go wrong with availing themselves of these packages. Each piece of equipment has been tested to work well with each other, yielding the best results.
Ready to enhance your dental practice seamlessly with long-term temps? Look no further—we have your back.
Step confidently into the future of dentistry by taking advantage of this remarkable opportunity today. Contact us now to scale up your long-term temporaries department. Rest assured, we provide professional support and guidance at every step, ensuring a smooth and efficient transition to a more streamlined and successful digital dental practice.


