Achieving optimal implant surgical outcomes starts with conscientious planning and precise guide design. However, the complexities of this process can be daunting, and many practices hesitate due to perceived workflow challenges.
The good news is, with the right tools and a streamlined approach, you can confidently have surgical guide planning and its design file to 3D print. This how-to guide provides all the information you and your staff need to succeed.
Let’s break it down into three simple steps:
Step 1. Gather Information
1. Patient’s record gathering
1.1 CBCT Scan:
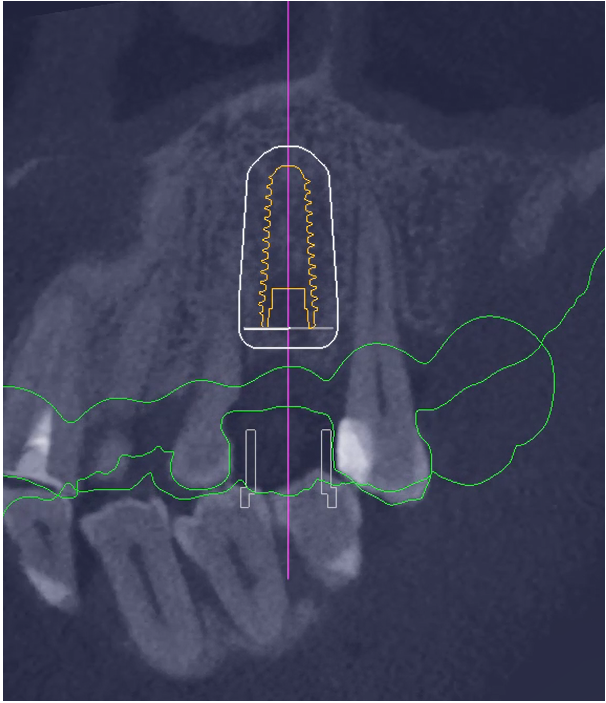
- Field of View (FOV): Capture the entire area of interest, including the relevant anatomical landmarks (condyles) for both the maxilla (upper jaw) and mandible (lower jaw).
- Resolution: Use a high-resolution setting for precise implant planning and surgical guide design.
- File Format: Save the scan in DICOM format, the industry standard for medical imaging compatible with dental software.
1.2 Intraoral Scans (missing single/multiple teeth patients’ case)
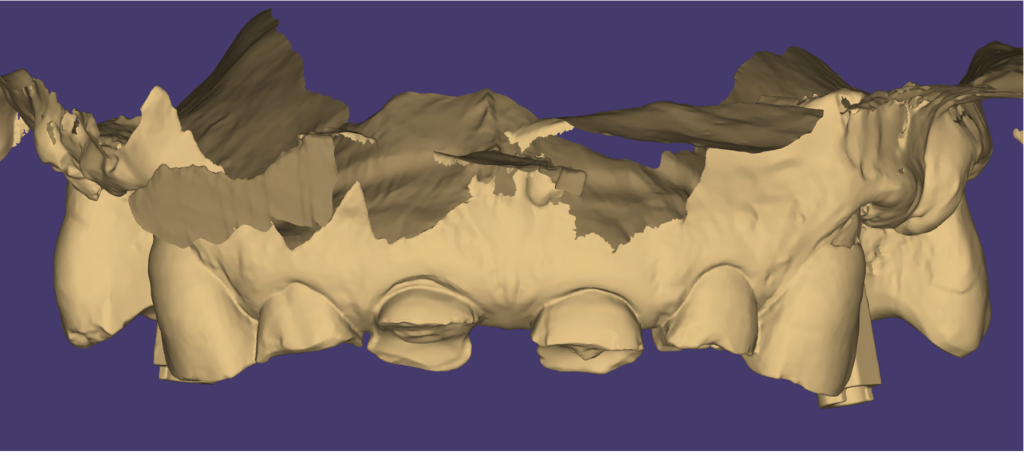
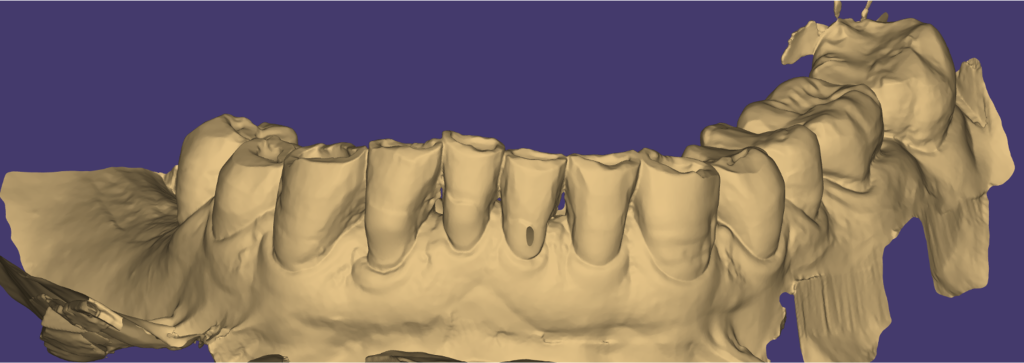
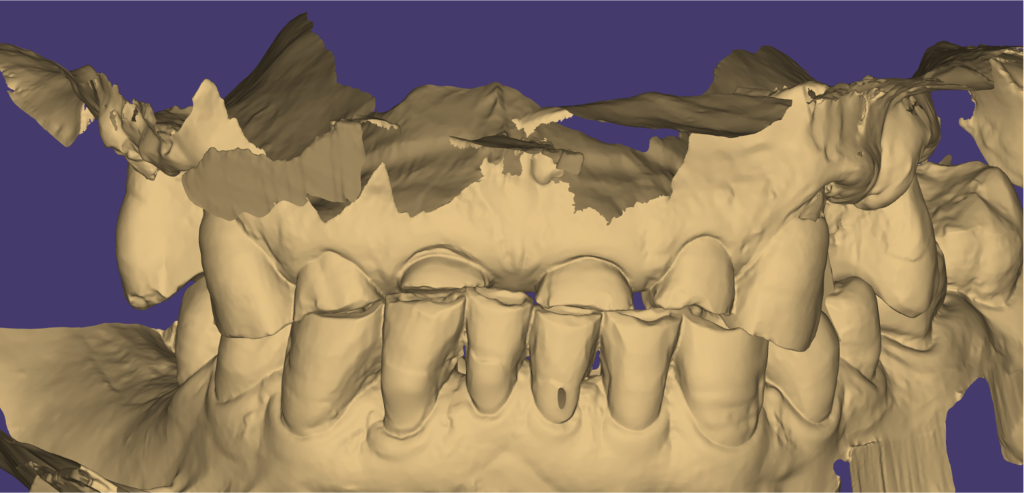
- Capture the edentulous space(s) where the implant(s) will be placed, along with the adjacent teeth on either side of the gap.
- Include the opposing arch in the scan for reference.
- File Format: Save the scans in STL/PLY format, commonly used for 3D printing and CAD/CAM software.
1.3 Clinical Photographs:
High-quality photos are crucial for accurate treatment planning and optimal prosthetic digital design. Here’s how to capture clear and informative images:
Extraoral Photographs:
- Full Face (Frontal & Profile): Capture the patient’s face in natural light, including the hairline and chin. Ensure a relaxed expression and proper head position.
- Close-up of Lips (Rest & Smile): Focus on the lips in both relaxed and full smile positions to assess lip length, symmetry, and support.
Intraoral Photographs:
- Full Arch (Maxillary/Mandibular): Retract cheeks to fully visualize the arch, including the retromolar pads or tuberosities. Capture both arches in occlusion (teeth biting together).
- Occlusal Views: Photograph the biting surfaces of both arches to assess the occlusal plane.
- Retracted Views: Use cheek retractors to reveal the buccal (cheek side) and lingual (tongue side) vestibules for a clear view of available soft tissue.
Key Tips:
- Use adequate lighting to avoid shadows.
- Retract soft tissues as needed for clear visibility.
- Ensure images are focused, stable, and high-resolution.
2. Treatment Plan Information:
Before submitting your case, ensure you have all the following information:
2.1 Implant Information
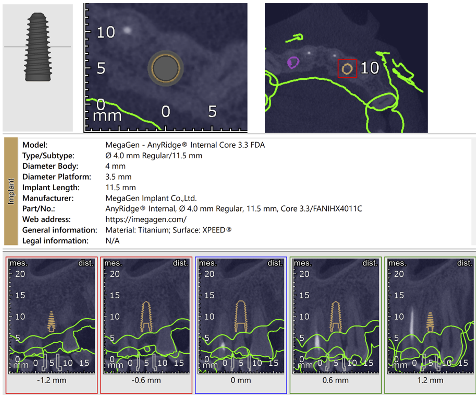
- Implant Brand and Model (for each implant): Specify the exact brand and model used (e.g., “Straumann BLT RN 4.8 x 10mm”).
- Implant Positions (FDI Notation): Clearly list the location of each implant using the FDI Two-Digit System (e.g., “13, 14, 15, 16 for upper right quadrant”).
2.2 Doctor’s Notes:
Restorative Preferences:
- Prosthetic Material: Specify your preferred materials for both the custom abutment and implant crown, as this choice will influence the required implant position height and available restorative space. (e.g., zirconia, metal, gold, UCLA and etc.).
- Occlusal Scheme: Indicate your preferred occlusal scheme, as this will influence the optimal angulation and positioning of the implants for achieving the desired prosthetic outcome.. (e.g., bilateral balanced occlusion, lingualized occlusion).
- Implant Connection Type: Specify whether you prefer an internal or external hex connection, as this choice affects the passivity of the restoration and may influence your clinical approach.
Aesthetic Goals:
- Tooth Shape and Size: Describe the desired tooth morphology for the final restoration, taking into consideration the specific aspects of the implant case and any specific requests from the patient.
- Smile Design: Outline the desired smile line, tooth proportions, and any other aesthetic considerations.
- Gingival Contour: Specify any preferences for the emergence profile or gingival contours, considering the patient’s biological width.
Functional Goals:
- Phonetics: Note any concerns or preferences regarding speech and pronunciation.
- Bite Force (if applicable): Mention the patient’s anticipated bite
2.3 Existing Diagnostic Information (Optional):
- Digital Scan of Wax-Up/Denture: If you already physical/digital diagnostic wax up provide a digital scan (STL file) to guide the prosthetic design.
Once you have compiled all this information, you are ready to submit the case to Evident.
Step 2. Submitting Your Case To Evident Hub
2.1 Log in to your Evident Account

- To submit your case to Evident, please log in to your account at Evident Hub. If you do not have an account yet, click on “Get Started” and select “Create Account”
Initiate Ordering Process
- Once logged in, find surgical planning and guide design from list of products on the Hub.
- Click on “Order Now” to proceed with your order.
2.2 Upload Case Information
At this stage you will see a guided ordering form that ensures the vision of both the patient and the doctor for this implant case is precisely communicated to your design team. Follow these steps to complete the form:
Add Patient Information:

Fill in your practice name, email address (optional), last name, first name, and birthday (optional).
Is this a full-arch design?

Yes/No: Indicate whether the surgical guide is for a full-arch (All-on-X) case or a partial-arch case. This helps Evident tailor the design process appropriately.
Is Your Case Single or Multiple Tooth Implants?
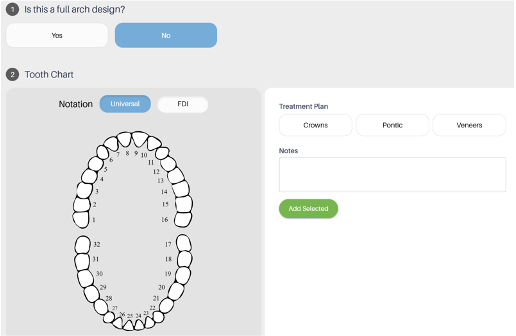
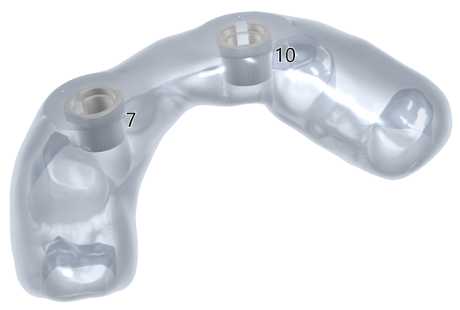
Tooth Chart: Select the teeth requiring implant reconstruction.
Implant System:
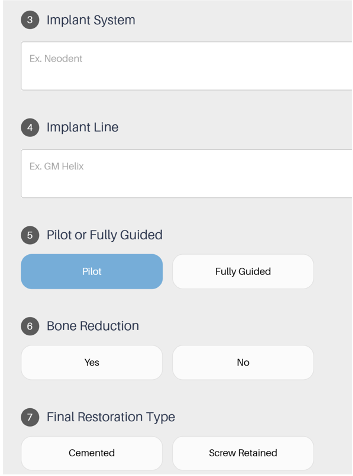
- Dropdown Menu: Select the specific implant system you will be using from the provided options. This is crucial to ensure compatibility between the surgical guide and the implants.
- “Other” Option: If your implant system is not listed, choose “Other” and specify the brand and model in the “RX Notes” section.
Implant Line:
Free Text: Specify the desired implant line or trajectory. This refers to the imaginary line that connects the centers of the planned implant positions.
Pilot or Fully Guided:
- Pilot: A pilot-guided approach involves using the surgical guide to initiate the osteotomies, but the surgeon ultimately determines the final implant position and angulation based on tactile feedback and experience.
- Fully Guided: A fully guided approach requires the surgeon to follow the surgical guide precisely for both implant position and angulation. This provides maximum accuracy but may require additional adjustments if unexpected anatomical variations are encountered.
Bone Reduction:
Yes/No: Indicate whether bone reduction is needed. This refers to the removal of bone tissue to create a suitable implant site. If unsure, consult with the Evident team for guidance.
Final Restoration Type:
- Screw Retained: The final implant crown will be attached to the implants using screws.
- Cement Retained: The final implant crown will be cemented onto the implants or abutments.
Anchor Pins(For full arch case):
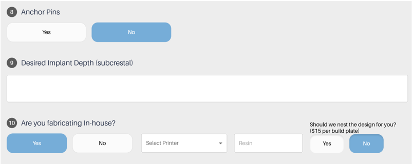
Conical: Conical anchor pins provide excellent stability and are often preferred for fully guided surgery.
Sleeve: Sleeve anchor pins offer flexibility and can be used for both pilot and fully guided approaches.
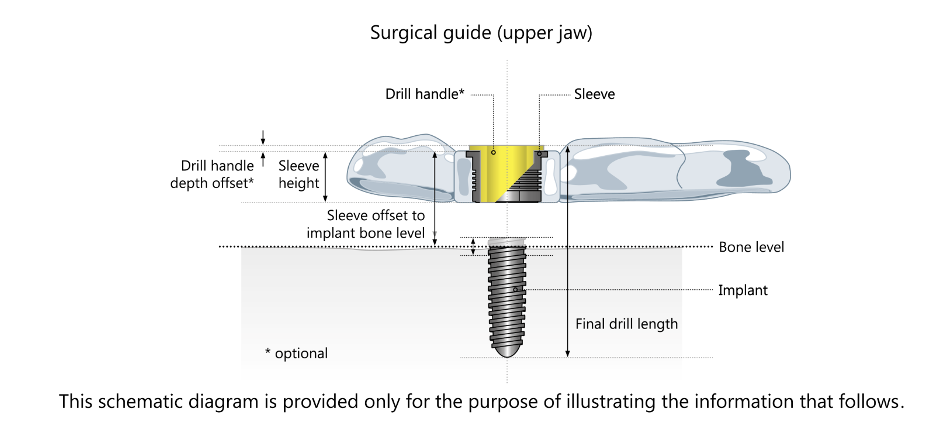
Desired Implant Depth (subcrestal):
Numerical Value (mm): Specify the desired depth at which the implant platform should be placed below the crest of the bone. This can vary depending on the size of implant system and clinical situation.
Are you fabricating in-house?
If YES, select your fabrication preference
If you are 3D printing your surgical guide in-house, you can customize your fabrication preferences to streamline the process. Follow these steps to ensure your design is ready for printing:
- Indicate In-House Fabrication: Select ‘Yes’ or ‘No’ to indicate if you are fabricating the design in-house.
- Choose Your Printer: If you selected ‘Yes’ for in-house fabrication, choose your printer from the dropdown menu.
- Specify Resin Type: Enter the type of resin you will 3D print the design
- Select Pre-Nested Files: To make the fabrication process even easier, opt for pre-nested files.
This ensures that your design is ready to print with proper supports, so all you need to do is drag, drop, and print. There is an additional fee of $15 per build plate for pre-nested files.
By setting these preferences, you can ensure a smooth and efficient printing process, with designs that are ready to go and require minimal preparation.
RX Notes:
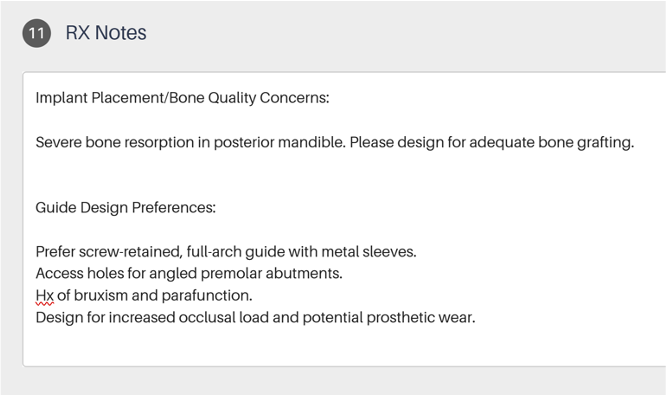
Free Text: This is a critical section for clear communication. Use this space to provide any additional details or instructions to the Evident team, such as:
- Specific concerns about implant placement or bone quality.
- Preferences regarding guide design.
- Any other relevant clinical information that could impact the treatment plan.
Required Files:
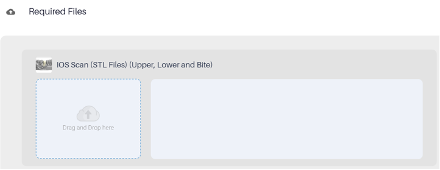
IOS Scan (STL Files): Upload STL files of the upper and lower arches and bite registration scan.
CBCT Scan: Upload the complete CBCT scan in DICOM format.
Additional Files (Optional): You can upload any additional relevant files, such as photographs or other radiographs.
2.3 Track Progress and Communicating with Your Designer
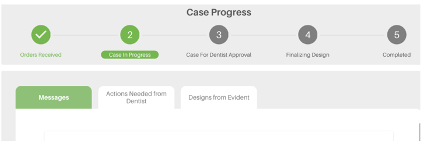
To ensure a seamless experience and stay informed about the progress of your designs, you can track and communicate with your designer through the Case Management section. Here’s how:
- Review Case Progress: Access the Case Management section to review the progress of your case at any time. Stay updated on the current status and any actions taken by the design team.
- Messages Your Designer: If you have questions or need to share details, easily send messages to your designer in the Case Management section.
- Review and Approve implant planning report: Thoroughly review the implant planning report, paying close attention to implant placement, system components, and overall treatment strategy. Make any necessary modifications or adjustments request to Evident team before giving your final approval. Upon approval, our team will generate the surgical guide design files for your use.
By using these features, you can efficiently manage your cases, ensure clear communication with your designer, and approve designs with confidence.
2.4 Your Case is Complete!
Once complete, you will receive the following files
- Implant planning report viewer file, including implant placement, system components, and overall treatment strategy.
- 3D STL file for surgical guide design files.
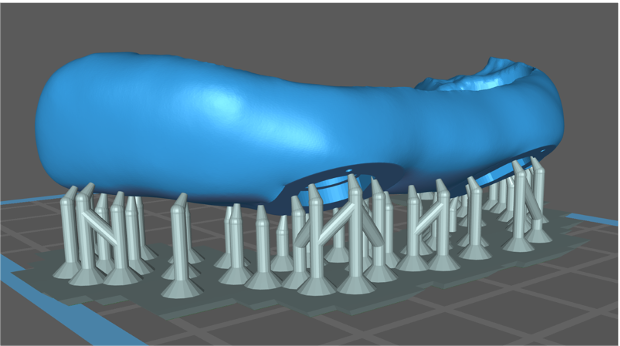
- 3D printable nested file for surgical guides.
Step 3. Fabricate Your surgical guide
3.1 Download nested files from Evident
After your case is complete, you can download the print-ready design files by selecting your case in case management tab.
3.2 It’s Time To 3D Print
Fabricate your design using your in-house 3D printing workflow. Follow three steps:
- 3D Print your design.
- Wash the 3D printed design.
- Cure it to finalize its durability.
For detailed process and workflow instructions specific to your 3D printer model and resin, please contact your 3D printer manufacturer’s support team.
Congratulations!
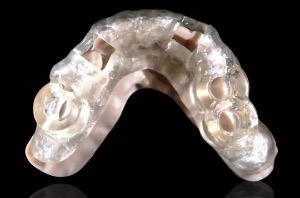
The Surgical guide Is now ready.
If you have any questions about the process, feel free to email us at akang@evidentdigital.com or call us at +1 (877) 909 7770.
To further streamline your workflow, we can help by coordinating fabrication. Here’s how we can assist:
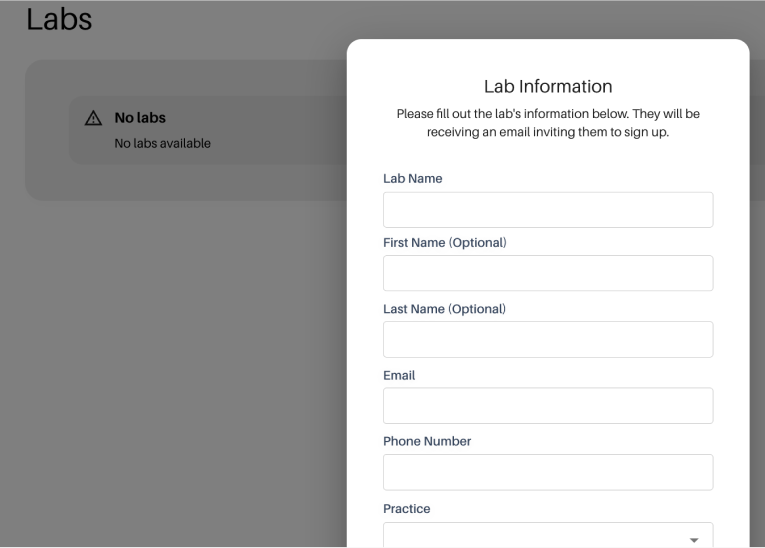
- Invite your existing lab: You can invite your preferred lab by choosing the option in the top right corner of the Evident Hub screen. We will help coordinate the fabrication process with them.
- Ask Evident for a preferred lab partner: Alternatively, your account manager can suggest an Evident preferred lab partner for a seamless experience.